> For clean Markdown of any page, append .md to the page URL.
> For a complete documentation index, see https://docs.tiankii.com/llms.txt.
> For AI client integration (Claude Code, Cursor, etc.), connect to the MCP server at https://docs.tiankii.com/_mcp/server.
# Getting started
This guide takes you from an empty terminal to a working payment link. It covers authentication, the identifiers the API expects, and how the four modules fit together.
## On this page
#### [1. Get your credentials](#1-get-your-credentials)
Create an API key and find your `store_id` and `app_id`
#### [2. Authenticate](#2-authenticate)
Send your key on every request, and scope it to a store
#### [3. How the modules fit together](#3-how-the-modules-fit-together)
Checkout Invoice, Customers, Products, and Payment Requests
#### [4. Make your first call](#4-make-your-first-call)
Create a payment link and share its URL
#### [5. Typical flows](#5-typical-flows)
Bill a customer, sell through a link, reconcile a charge
#### [Next: the checkout flow](/docs/checkout-flow)
What the payer sees, and the API call behind every screen
## 1. Get your credentials
Register or log in to the merchant portal at [pay.tiankii.com](https://pay.tiankii.com). You can sign up with a phone number, an email address, or single sign-on via Google, Microsoft, or Twitter.
#### Create your API key
Go to **Store settings → Development Workspace** and click **Create API Key**. Fill in the form, then click **Copy Secret**.
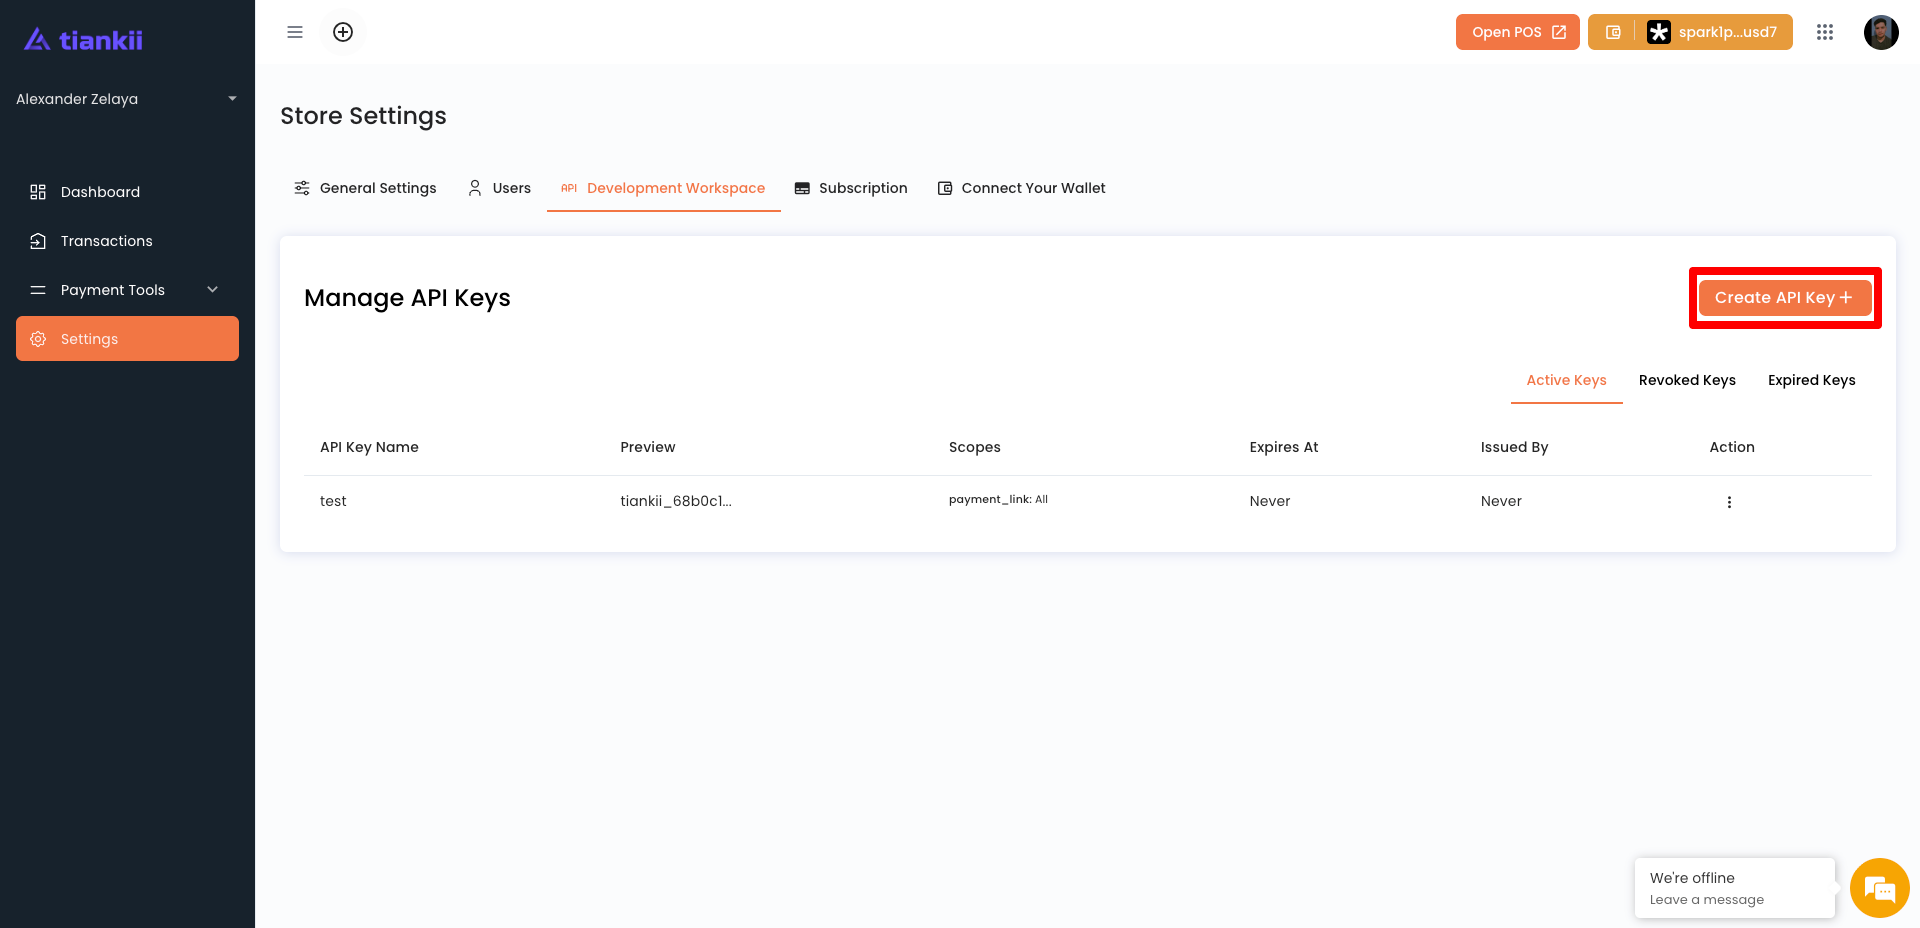 Copy the secret before you leave the screen. The list only ever shows a masked preview, so once you navigate away there is no way to recover the full value — you'd have to create a new key.
#### Get your \`store\_id\`
Your Store ID is shown in the **Credentials** card, under **Store ID** — it identifies your store in every API request. Click the copy icon to grab it.
Copy the secret before you leave the screen. The list only ever shows a masked preview, so once you navigate away there is no way to recover the full value — you'd have to create a new key.
#### Get your \`store\_id\`
Your Store ID is shown in the **Credentials** card, under **Store ID** — it identifies your store in every API request. Click the copy icon to grab it.
 #### Get your \`app\_id\`
In the same **Credentials** card, open the **Select app** dropdown and pick the application you're integrating. Its identifier appears below as **Selected App ID**, ready to copy.
This is the value that app-scoped endpoints expect. If you work with more than one app, repeat the selection for each.
#### Get your \`app\_id\`
In the same **Credentials** card, open the **Select app** dropdown and pick the application you're integrating. Its identifier appears below as **Selected App ID**, ready to copy.
This is the value that app-scoped endpoints expect. If you work with more than one app, repeat the selection for each.
 ### What each identifier is for
| Variable | Where it goes | What it identifies |
| --------------- | ------------------ | --------------------------------------------------------------------------- |
| `api_key` | `x-api-key` header | Your merchant account. Authenticates every request. |
| `store_id` | Request body | Your store or merchant account on the platform. |
| `app_id` | Request body | The specific application, sale terminal, or POS the transaction belongs to. |
| `pay_method_id` | Request body | The payment method to process or enable for the transaction. |
## 2. Authenticate
Every request sends your key in the `x-api-key` header:
```bash title="cURL"
curl https://api.md.tiankii.com/v1/customers \
-H "x-api-key: $TIANKII_API_KEY"
```
```javascript title="JavaScript"
const res = await fetch("https://api.md.tiankii.com/v1/customers", {
headers: { "x-api-key": process.env.TIANKII_API_KEY },
});
const customers = await res.json();
```
```python title="Python"
import os, requests
res = requests.get(
"https://api.md.tiankii.com/v1/customers",
headers={"x-api-key": os.environ["TIANKII_API_KEY"]},
)
customers = res.json()
```
`x-account-api-key` works as an alias for `x-api-key`. To scope a key to a specific store or account, send `x-application-account-id` (alias `x-account-id`), or pass it as the `application_account_id` / `account_id` query parameter.
Never expose your `x-api-key` in public repositories, browsers, or any client-side code. Treat it like a password — it authenticates as your merchant account.
## 3. How the modules fit together
| Module | Base | What it holds |
| -------------------- | ---------------------- | ----------------------------------------------------------------------------------------------------- |
| **Checkout Invoice** | `/v1/invoice` | The Lightning or on-chain charge generated when someone actually pays. |
| **Customers** | `/v1/customers` | Your buyers. `email` is unique per store. They're the recipients of the invoices you issue. |
| **Products** | `/v1/products` | Your catalog, its modifiers, and the places (apps / terminals) where each product is sold. |
| **Payment Requests** | `/v1/payment-requests` | The aggregate you use to collect payment. Its `type` is `PAYMENT_LINK`, `INVOICE`, or `SUBSCRIPTION`. |
Each module's reference section opens with a detailed overview — scopes, constraints, and related routes. Start with the [API Reference](/api-reference) once you've made your first call.
**Invoices vs. checkout invoices.** An **invoice** is a payment request of type `INVOICE` — the *bill that is issued*, living under `/v1/payment-requests/billing-invoices`. A **checkout invoice** is the `/v1/invoice` module — the *charge that is executed*. Two different objects.
## 4. Make your first call
The fastest way to get paid is a payment link: create it once, share the URL, collect one or many payments.
```bash
curl -X POST https://api.md.tiankii.com/v1/payment-requests/links \
-H "x-api-key: $TIANKII_API_KEY" \
-H "Content-Type: application/json" \
-d '{
"title": "Dinner for two",
"description": "Table service, includes tip",
"amount": 49.99,
"currency": "USD",
"quantity": 1,
"allowCustomQuantity": false,
"buttonText": "Pay now",
"showConfirmPage": true,
"redirectUrl": "https://merchant.example.com/thanks"
}'
```
Every other endpoint follows the same shape. The [API Reference](/api-reference) has a runnable example for each one.
## 5. Typical flows
#### Bill a customer and get paid
1. `POST /v1/customers` — create the customer, or find them with `GET /v1/customers`.
2. `POST /v1/payment-requests/billing-invoices` — create the bill against that `customerId`.
3. `POST /v1/payment-requests/billing-invoices/:id/send` — email it to one or more recipients.
4. `GET /v1/payment-requests/billing-invoices/:id/pdf` — download the PDF if you need a copy.
5. When the customer pays, a **checkout invoice** is generated. Track it with `GET /v1/invoice/:id` and `GET /v1/invoice/:id/events`.
6. `PATCH /v1/payment-requests/:id/complete` — close out the payment request.
#### Sell through a shareable link
1. `POST /v1/payment-requests/links` — create the link.
2. Share the hosted page. It stays open and can collect many payments.
3. `GET /v1/payment-requests?type=PAYMENT_LINK` — list your links and their state.
4. `PATCH /v1/payment-requests/:id/deactivate` — stop accepting payments, or `/activate` to reopen.
5. `PATCH /v1/payment-requests/:id/archive/:value` — archive it once you're done.
#### Reconcile a charge
1. `GET /v1/invoice` — list charges.
2. `GET /v1/invoice/:id/events` — inspect the full event trail for one charge.
3. `PATCH /v1/invoice/:id/reopen` or `PATCH /v1/invoice/:id/cancel` — correct a charge that went wrong.
4. `POST /v1/invoice/:id/notification` — re-send the paid-invoice notification.
## Where to next
#### [Checkout flow](/docs/checkout-flow)
Follow a payment through the hosted checkout — payment method, QR, wallet, receipt — and the API call behind each screen
#### [API Reference](/api-reference)
Every endpoint, parameter, and response, with a runnable example for each
### What each identifier is for
| Variable | Where it goes | What it identifies |
| --------------- | ------------------ | --------------------------------------------------------------------------- |
| `api_key` | `x-api-key` header | Your merchant account. Authenticates every request. |
| `store_id` | Request body | Your store or merchant account on the platform. |
| `app_id` | Request body | The specific application, sale terminal, or POS the transaction belongs to. |
| `pay_method_id` | Request body | The payment method to process or enable for the transaction. |
## 2. Authenticate
Every request sends your key in the `x-api-key` header:
```bash title="cURL"
curl https://api.md.tiankii.com/v1/customers \
-H "x-api-key: $TIANKII_API_KEY"
```
```javascript title="JavaScript"
const res = await fetch("https://api.md.tiankii.com/v1/customers", {
headers: { "x-api-key": process.env.TIANKII_API_KEY },
});
const customers = await res.json();
```
```python title="Python"
import os, requests
res = requests.get(
"https://api.md.tiankii.com/v1/customers",
headers={"x-api-key": os.environ["TIANKII_API_KEY"]},
)
customers = res.json()
```
`x-account-api-key` works as an alias for `x-api-key`. To scope a key to a specific store or account, send `x-application-account-id` (alias `x-account-id`), or pass it as the `application_account_id` / `account_id` query parameter.
Never expose your `x-api-key` in public repositories, browsers, or any client-side code. Treat it like a password — it authenticates as your merchant account.
## 3. How the modules fit together
| Module | Base | What it holds |
| -------------------- | ---------------------- | ----------------------------------------------------------------------------------------------------- |
| **Checkout Invoice** | `/v1/invoice` | The Lightning or on-chain charge generated when someone actually pays. |
| **Customers** | `/v1/customers` | Your buyers. `email` is unique per store. They're the recipients of the invoices you issue. |
| **Products** | `/v1/products` | Your catalog, its modifiers, and the places (apps / terminals) where each product is sold. |
| **Payment Requests** | `/v1/payment-requests` | The aggregate you use to collect payment. Its `type` is `PAYMENT_LINK`, `INVOICE`, or `SUBSCRIPTION`. |
Each module's reference section opens with a detailed overview — scopes, constraints, and related routes. Start with the [API Reference](/api-reference) once you've made your first call.
**Invoices vs. checkout invoices.** An **invoice** is a payment request of type `INVOICE` — the *bill that is issued*, living under `/v1/payment-requests/billing-invoices`. A **checkout invoice** is the `/v1/invoice` module — the *charge that is executed*. Two different objects.
## 4. Make your first call
The fastest way to get paid is a payment link: create it once, share the URL, collect one or many payments.
```bash
curl -X POST https://api.md.tiankii.com/v1/payment-requests/links \
-H "x-api-key: $TIANKII_API_KEY" \
-H "Content-Type: application/json" \
-d '{
"title": "Dinner for two",
"description": "Table service, includes tip",
"amount": 49.99,
"currency": "USD",
"quantity": 1,
"allowCustomQuantity": false,
"buttonText": "Pay now",
"showConfirmPage": true,
"redirectUrl": "https://merchant.example.com/thanks"
}'
```
Every other endpoint follows the same shape. The [API Reference](/api-reference) has a runnable example for each one.
## 5. Typical flows
#### Bill a customer and get paid
1. `POST /v1/customers` — create the customer, or find them with `GET /v1/customers`.
2. `POST /v1/payment-requests/billing-invoices` — create the bill against that `customerId`.
3. `POST /v1/payment-requests/billing-invoices/:id/send` — email it to one or more recipients.
4. `GET /v1/payment-requests/billing-invoices/:id/pdf` — download the PDF if you need a copy.
5. When the customer pays, a **checkout invoice** is generated. Track it with `GET /v1/invoice/:id` and `GET /v1/invoice/:id/events`.
6. `PATCH /v1/payment-requests/:id/complete` — close out the payment request.
#### Sell through a shareable link
1. `POST /v1/payment-requests/links` — create the link.
2. Share the hosted page. It stays open and can collect many payments.
3. `GET /v1/payment-requests?type=PAYMENT_LINK` — list your links and their state.
4. `PATCH /v1/payment-requests/:id/deactivate` — stop accepting payments, or `/activate` to reopen.
5. `PATCH /v1/payment-requests/:id/archive/:value` — archive it once you're done.
#### Reconcile a charge
1. `GET /v1/invoice` — list charges.
2. `GET /v1/invoice/:id/events` — inspect the full event trail for one charge.
3. `PATCH /v1/invoice/:id/reopen` or `PATCH /v1/invoice/:id/cancel` — correct a charge that went wrong.
4. `POST /v1/invoice/:id/notification` — re-send the paid-invoice notification.
## Where to next
#### [Checkout flow](/docs/checkout-flow)
Follow a payment through the hosted checkout — payment method, QR, wallet, receipt — and the API call behind each screen
#### [API Reference](/api-reference)
Every endpoint, parameter, and response, with a runnable example for each